
 While most of my quilts are now completed on my long arm, I have quilted dozens of quilts, some as large as a double, on my domestic machine.
 There are three basic choices for holding your quilt together for quilting. They are hand basting, safety pins or spray basting. Generally speaking, I prefer to spray baste my layers together. It is fast and easy. It holds the layers together with little trouble and it prevents most shifting. My personal choice is 505 Spray. While initially, it can seem quite expensive, you must remember that one small can will baste several queen sized quilts. They key is using a light spray. It is baste, not glue. It takes only a light spraying to keep the layers intact. I do find that 505 does not work well with some 100% polyester batting. If you plan to use 100% poly batting, test the adhesion before you begin.
To begin, cut your backing about 6 inches larger than your quilt top. If you have a large enough table, use large binder clips or painters masking tape to hold your top to the table. If your table is not large enough, tape it to the floor or look into renting table space at your local quilt shop. (The trouble with taping it to the kitchen floor is that you have to move the table and chairs, sweep, scrub, baste the quilt and then scrub again to remove the basting spray. But the trouble is worth it in the end.) Ensure that your backing is flat and unwrinkled without stretching it. Pull it taut without stretch or distortion. I prefer to tape all the way around the backing. It uses more tape, but reduces shifting of the layers.
Once the backing is smooth, layer it with an equal sized piece of batting. Be sure the batting is smooth and equally spaced over the backing. Take care not to stretch or warp the batting when smoothing it. Be careful not to shift the backing fabric. Fold the batting up to the half way point and lightly spray the 505 to cover about 12 inches of the backing. Fold those 12 inches of batting back down and smooth them. This spray is re-positionable, so if it puckers, simply lift it and spray again. Once it is smooth, do the next 12 inches. When this side is complete, fold the other half of the batting up and repeat.
Now that the batting is smooth, layer the quilt top and smooth it in place. As you have done with the batting, you will fold back half of the quilt top, spray 12 inches, unfold, smooth and repeat. Remove the tape and check the back for wrinkles. It should be noted here that it will not be perfectly flat. Like a quilted quilt, it will have some texture. There should not be any bulges, folds or puckers.
Now that it is correct, you can begin quilting. If the quilt is larger than a lap quilt, I like to add a few pins to keep it in place. When you are doing the quilting, your quilt sandwich will be folded, twisted, puckered, shoved and pulled. A couple pins keep the sandwich intact. I like to pin about every 10 to 12 inches if I have already spray basted.
If your space is not large enough, this can be done in sections. Complete layering one section, then do the next. I prefer to do full widths or lengths if I can rather than quarters. There is less folding and shuffling this way. Simply start at the top of your quilt and baste the top section, shift everything up, do the next section and work your way down. It is harder to get the quilt smooth this way, but it can be done!
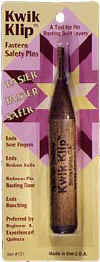 Pin Basting: For pin basting start by opening all of your pins. Tape the backing down, add the batting and smooth it. Add the top and smooth it. Working from the center out, pin the quilt about every 6 inches. You should stagger your rows by three inches to avoid long rows without pins. I prefer to use small safety pins rather than large ones. They are harder to put in but seem to hold the layers together better. Buy good pins. Cheap pins are often dull and have trouble penetrating the layers. You will need about 400 pins for a lap quilt. Your local quilt shop may sell a pin clip, the Kwik Klip. This is a special tool for closing safety pins. Consider purchasing one if you plan to pin a lot of quilts. When you are quilting, remove the pins as you come to them.
Hand Basting: For hand basting use a light colored thread and use large stitches. Do not tie the thread off, leave the tails and space your rows about 4 inches across. Work from the center out and stitch both horizontally and vertically.
My next posting will be on fitting that monster on your sewing machine.
Question of the Day: What is your preferred method for basting your quilt? (I cheat and use my long arm.)


