Pages

Saturday, April 23, 2011

Generosity: The Kindness of Quilters

Quilters are very generous and giving people. Got a problem, ask and they'll try to help you out even if the problem is not quilt related. Got a question, they've got the answer. On occasion, they'll offer solutions even when you didn't know you had a problem. I belong to Piecemaker's Quilt Guild here in Calgary and my fellow members are kindness itself. They cannot wait to share what they know or point out a new technique. They never hesitate to help someone out or to make a quilt for charity.

Quilters have huge hearts.There are countless groups and guilds making quilts to help out someone else. Quilters spend hundreds of dollars and untold hours creating a quilt and then give it away to charity. People made homeless by disaster or job troubles, we've got a quilt for you. Meals-on-Wheels, you need place mats, look no further. Tiny premature babies separated from their parents by incubators, we've got a quilt to keep you feeling warm and loved. I've only just recently learned of a group here in Calgary that makes quilts for the police to give to children who have been removed from abusive homes. If there is a need, there is a group of quilters toiling away, with smiles on their faces, to fill that gap.

As you know, I am a longarm quilter. It took a long time for me to take the plunge and purchase that machine. It was a huge step for me, but after much soul searching and discussion with my husband I took that plunge. That was over six years ago. I've loved every minute of work during that time. (Well, except for those days where nothing goes right!)
When I finally received my machine, I joined an informal group of longarmers here in Calgary. They are, down to the very last member, a wonderful group of ladies. They are always ready to share their knowledge and are eager to break out the coffee pot if you need someone to vent to when difficulties arise.

When I was learning to longarm I spent a lot of time on the phone to the ladies in my group asking questions. One in particular offered me everything she knew and if there was something she didn't know, she helped me find answers. I had some mighty dumb questions (yes there are dumb questions, but they still need answers) and I made some pretty horrendous mistakes, but she helped me out each and every time. She talked me through problems, sent me to web-sites, loaned me books and videos and offered constructive criticism. To her I say thank you. Thank you Jane G., you've helped me build my business and I owe you more than words can ever express. Call me and I'll buy you lunch.

The Orchids in my kitchen window. Of nine plants,
eight are in bloom or are forming buds. I offer
them for your enjoyment and as a virtual
bouquet of thanks to Jane and all those other
quilters who are making a difference.

I like to think that I've returned the favor too. So far, she hasn't needed my help, but a lot of other new quilters have called me up asking for help and I pitch in where I can.

It has been my policy to be an open book regarding quilting. If you have a question, ask me and I'll tell you what I know. I don't profess to be an expert, but I am good at what I do, getting better and I love to give advice. (Who doesn't?) 
It is my opinion (and isn't what this blog is all about?) that we're all in this together. Sharing what we know and do only helps us learn and grow and makes us a stronger community. Wanting to give back for all the help I received when I started out is what lead me to the latest iron in my fire.

I've talked before about life getting in the way of quilting and other fun things, but I have to be honest here... sometimes I'm my own worst enemy. I've got a lot going on in my life and I keep finding new things to do. So far I am a quilter, longarm quilter, quilting teacher, pattern designer, knitter, crocheter, reader, blogger, novelist (unpublished, but it eats a lot of time), wife, mother, daughter, assistant lacrosse coach, pet owner, and now the Longarm Liaison for Wonderfil Threads (http://www.wonderfil.net/).

I love their threads and use a lot of them, so when they approached me about working for them I agreed. I get to troubleshoot for other longarmers who are having troubles with Wonderfil threads, or who are just looking to learn more about the products and their usage. It is fabulous! I've met (over the phone and in person) a lot of really nice people and it gives a real satisfaction when I am able to help someone out. This is not something I took on without thinking, or in haste.

It takes a lot of time, but their product is one I believe in. so, I signed myself up to help them out. Its been fun and its been frustrating, but when a fellow longarm quilter calls me up and tells me that her new threads are perfect, or that my advice helped out and that things are running smoothly again it feels real nice to know I've given back some of what was given to me.

It's a circle of giving. Next time someone asks you a question or needs advice, help them out. In time it will come back to you and you'll be glad you came through for someone else.

QUESTION OF THE DAY: Do you give back? Do you make charity quilts or share your knowledge with other quilters? Let me know, I would love to hear about it.

Wednesday, April 6, 2011

Back Away From the Vacuum


A variation of the Bali bag I
made for my sister. She
loves purple and ducks. One
of the few projects I
got bound while at
my folks.
 Life is a funny thing. Bad things happen, good things happen and still life goes on. My life has been upside down lately. Lots of stuff going on. Good and bad. I won't bore you with details that's not the point of this posting.

The point is that sometimes we need to step back, let go and relax. With things being so crazy busy around here, I let a few things slide and you know what? Everything and everyone came through fine. I'm not a house keeper by any stretch of the imagination, but while I was spending so much time at my folks house, I did not do one lick of housework when I spent the odd day at home. Did I feel guilty? Absolutely! At first. Then I decided that it really didn't matter that there were cat hair dust bunnies the size of rabbits rolling around the living room. I admit, dirty dishes do bother me and I kept after those and kept the kitchen tidy with the help of my darling hubby. He kept the place picked up and the bathrooms clean. But the sweeping, dusting and vacuuming went by the wayside.

Guess what people, the world didn't explode. Nothing bad happened. As a bonus, when I did get around to vacuuming, it only took me an extra ten minutes to catch up. That's what I call time management at its finest.

While I was gone, I didn't get to spend nearly as much time as I wanted with my children, husband and friends, but through the marvel of technology and text messaging, we kept in touch. No, it wasn't like being together in person, but it was a comfort to text them and vent a bit when things were tough, and to share the lighter moments as well.

Back to the relaxing part. When I first came home I spent a full week just relaxing. I didn't call anyone. I didn't do any work, not even finishing up my accounting for taxes. I sat in my chair with a cup of coffee, read books and did some blog reading. When I felt so inclined I spent time in my studio puttering about. I cleaned it, I sewing long strips together for a scrap quilt. I watched a couple movies and did some hand binding. In short, I did only what I felt like doing. I skipped the detail work and customer quilts hung in their queue calling me but I avoided them.

The most important thing I did do was say NO. When hubby said do you want to go to Home Depot, I said no thanks. When the kids called to see if I was making supper, I said no. That's not my usual way but you know what? I didn't feel guilty, not one bit. Okay, maybe a little. But I needed that time to unwind.

Now, I'm back after it. Things are back to their usual busy state and I'm loving it. I'm perked up, refreshed and raring to go. Just as soon as I finish my coffee.

Friday, February 25, 2011

Trends


As a long arm quilter I see a lot of quilts come and go. Recently, I've noticed a few trends.

1.Hand applique is way up and fusible web applique has become less popular. I've found that over long periods of time and many washings the fusible web tends to fray around the edges unless it is satin stitched down. Hand applique has better staying power and has the bonus of being something you can do while waiting at lacrosse practice or watching TV.

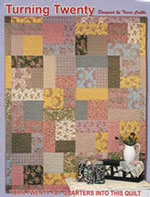
Turning Twendy
by Tricia Cribbs

2.Beginners are all making big block quilts like Turning 20 rather than samplers. I think that those quick easy quilts give a better sense of satisfaction and are less frustrating to a beginner. Tricia Cribbs has created a fast and unique pattern that makes a fabulous quilt in no time.

3.Experienced quilters are making quilts with two or three different blocks in them. These blocks usually make a secondary pattern.

4.And, most startling of all is the fact that they are all huge. The average quilt I've finished recently would be a large double. King size is very popular. Contrasting this, I've done a large number of wee tiny ones. 30 X 40 and smaller. And the biggest a whomping 112 X 140. I thought I would never finish that one.

5. Most of my customers have started quilting their own smaller projects. They are saving their funds for fabric. These economic times are tough and money doesn't go as far as it used to. In order to keep quilting they tell me that cuts must be made and for smaller projects, I am the cut.

My own trends: I'm doing a lot of geometric designs like the one at the top of this post and a new design or mine that is all stars. I'm also doing a ton of hand applique. This is for two reasons, first I love the hand work and second because I'm spending a lot of time at my parents place in Edmonton. Dad had a stroke and is well on the way to a full recovery, but the rehab hospital is downtown and Mom doesn't feel comfortable driving there. Don't get me wrong I'm not complaining, I love this chance to help out my folks and to repay them for all the great things they've done for me over the years. The only real trouble is that I miss my studio and my family.

That's all for now folks. I'll try to get back to regular posts, but my focus is on other things right now.

Question of the Day: Are you in color grid-lock? Do you tend to work only in a few colors? Are there colors you hate? (I have real trouble with brown.) Let me know....

Cath

Saturday, January 15, 2011

Fitting that Quilt Sandwich Into Your Domestic Machine

Quilting and prize winning are the topics of today. One lucky person has won a Wonderfil thread prize package. The rest of you get to learn a bit about fitting your quilt into your domestic machine.

First, I must apologize for the delay with this posting. Sometimes life has a way of getting in the way of what we want to do and sometimes is gets in the way of what we should be doing. I'll just keep it short and sweet and say that Dad came out of his surgery well, they've given him new meds that should fix the growths on his feet and he's walking better than he has for years. Go Dad!

Now, onto quilting. When quilting that lovely quilt sandwich we made last week, it is easy to become intimidated when we start thinking about where to begin. First and foremost, we always start in the middle and work our way out. If we were going to stipple the quilt, we would wind several bobbins with our desired thread and thread the machine. We'll probably need at least six to eight bobbins for a double. The reason we load all those bobbins is because once we have that sandwich under the machine, we don't want to remove it to wind a new bobbin.

Next change your needle. Yup, you heard me. A new needle is in order, and now just any needle. You need a QUILTING needle. I can hear you now, "but I use the same needle for everything, why should I change now?" The short and sweet answer is that each needle is designed for a specific purpose and while sometimes we can't see the difference, there are differences between needles and for best results, we want the one designed for the job. You wouldn't haul gravel in the trunk of your car would you? So why would you use the wrong tool for this job? You've spent hundreds of dollars on that quilt, why skimp on the cost of a needle? Get a quilting needle, it has a longer throat and eye and the tip is shaped to penetrate all those layers batting.
Get out your test sandwich and get take a test drive. This warms up your arms, gets your mind in quilting mode and ensures that your tension is correct. As a side note, when having tension problems check your threading first. Then check that your bobbin is in correctly. Then fiddle with your tension. After that, consider using different threads in top and bottom. Some of those "slippery" threads need a thread with "grip" to hold them in place. Both Invisifil and Decobob by Wonderfil have a bit of grip to better hold rayons and polyesters in place. When everything looks right, it is time to start quilting.

Many books and web-sites recommend that you should roll your quilt up (like you would a magazine for swatting flies) to fit it under the machine. DO NOT DO THIS! When you roll your quilt up, it is like trying to ram a canoe into that little space, There is no flex or bend to a rolled up quilt. Instead accordion fold your quilt. This gives flex and allows for easier movement under the foot.

You can fold up one side of your quilt, and drape the other over your shoulder and on your lap. Ensure your sewing table is free of clutter that might impede the movement of your quilt. If you are stitching in the ditch, or stitching long straight lines of quilting, you will stitch the first row top to bottom and the next row bottom to top. This keeps the top from continually shifting towards one end. If you are stippling or free motion quilting, start in the center and stitch a small area the work your way to one end. When you reach one end, go back to the center and work towards the other end.

Some quilters like to back stitch to hold their stitches in place, I prefer to pull the bottom thread to the top and bury them both when I remove the quilt from the machine. This allows invisible starts and stops. When you begin stippling in the center, you can restart at the exact same place and continue in the other direction if you did not back stitch. When you are finished bury the threads and like magic you have one continuous line of stipple.


A cute wall hanging
from one of my clients.

Stitch as much area as you can comfortable do without unfolding your quilt accordion, then refold and start again. When stitching very large areas, I will pass a huge safety pin through the folds in a couple spots to hold them together, or clamp them with bicycle (pant legs) clips.  Repeat this until you are finished. If you are stippling or free motion quilting, you will be finished at this point. If you are doing straight line or stitch in the ditch, you will need to check the back for any significant shifting. Fix any mistakes you see on the back before continuing. Now, fold the quilt the other way (fold up the bottom if you started with the sides) and start quilting the lines going the other way. Remember to go left to right for one row and right to left for the next.

Hope all that helps.

Now, onto the good stuff. THE WINNER OF OUR THREAD DRAW IS: Lee. I have sent you an email Lee. Watch for it in your in-box.

QUESTION OF THE DAY: What quilting technique do you excel at and which one do you detest?

Friday, January 7, 2011

Layering Your Quilt For Quilting

While most of my quilts are now completed on my long arm, I have quilted dozens of quilts, some as large as a double, on my domestic machine.

There are three basic choices for holding your quilt together for quilting. They are hand basting, safety pins or spray basting. Generally speaking, I prefer to spray baste my layers together. It is fast and easy. It holds the layers together with little trouble and it prevents most shifting. My personal choice is 505 Spray. While initially, it can seem quite expensive, you must remember that one small can will baste several queen sized quilts. They key is using a light spray. It is baste, not glue. It takes only a light spraying to keep the layers intact. I do find that 505 does not work well with some 100% polyester batting. If you plan to use 100% poly batting, test the adhesion before you begin.

To begin, cut your backing about 6 inches larger than your quilt top. If you have a large enough table, use large binder clips or painters masking tape to hold your top to the table. If your table is not large enough, tape it to the floor or look into renting table space at your local quilt shop. (The trouble with taping it to the kitchen floor is that you have to move the table and chairs, sweep, scrub, baste the quilt and then scrub again to remove the basting spray. But the trouble is worth it in the end.) Ensure that your backing is flat and unwrinkled without stretching it. Pull it taut without stretch or distortion. I prefer to tape all the way around the backing. It uses more tape, but reduces shifting of the layers.

Once the backing is smooth, layer it with an equal sized piece of batting. Be sure the batting is smooth and equally spaced over the backing. Take care not to stretch or warp the batting when smoothing it. Be careful not to shift the backing fabric. Fold the batting up to the half way point and lightly spray the 505 to cover about 12 inches of the backing. Fold those 12 inches of batting back down and smooth them. This spray is re-positionable, so if it puckers, simply lift it and spray again. Once it is smooth, do the next 12 inches. When this side is complete, fold the other half of the batting up and repeat.

Now that the batting is smooth, layer the quilt top and smooth it in place. As you have done with the batting, you will fold back half of the quilt top, spray 12 inches, unfold, smooth and repeat. Remove the tape and check the back for wrinkles. It should be noted here that it will not be perfectly flat. Like a quilted quilt, it will have some texture. There should not be any bulges, folds or puckers.

Now that it is correct, you can begin quilting. If the quilt is larger than a lap quilt, I like to add a few pins to keep it in place. When you are doing the quilting, your quilt sandwich will be folded, twisted, puckered, shoved and pulled. A couple pins keep the sandwich intact. I like to pin about every 10 to 12 inches if I have already spray basted.

If your space is not large enough, this can be done in sections. Complete layering one section, then do the next. I prefer to do full widths or lengths if I can rather than quarters. There is less folding and shuffling this way. Simply start at the top of your quilt and baste the top section, shift everything up, do the next section and work your way down. It is harder to get the quilt smooth this way, but it can be done!

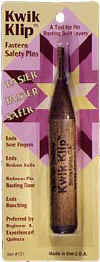
Pin Basting: For pin basting start by opening all of your pins. Tape the backing down, add the batting and smooth it. Add the top and smooth it. Working from the center out, pin the quilt about every 6 inches. You should stagger your rows by three inches to avoid long rows without pins. I prefer to use small safety pins rather than large ones. They are harder to put in but seem to hold the layers together better. Buy good pins. Cheap pins are often dull and have trouble penetrating the layers. You will need about 400 pins for a lap quilt. Your local quilt shop may sell a pin clip, the Kwik Klip. This is a special tool for closing safety pins. Consider purchasing one if you plan to pin a lot of quilts. When you are quilting, remove the pins as you come to them.

Hand Basting: For hand basting use a light colored thread and use large stitches. Do not tie the thread off, leave the tails and space your rows about 4 inches across. Work from the center out and stitch both horizontally and vertically.

My next posting will be on fitting that monster on your sewing machine.

Question of the Day: What is your preferred method for basting your quilt? (I cheat and use my long arm.)